fbpx
Heel Toe Technique: Pro tips

Heel Toe Technique: Pro tips

Here’s a quick drum lesson about with pro tips to help you nail the Heel Toe technique! It’s not as tricky as you think it is, and once you get it you can’t unlearn it, so let’s dive straight into it.


WHAT IS THE HEEL TOE TECHNIQUE?

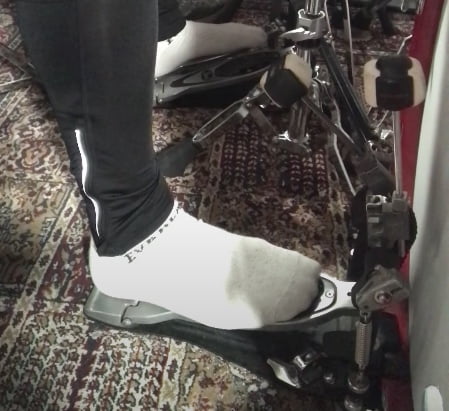
It’s a technique that helps us play two (or more) quick consecutive bass drum strokes in what’s, pretty much, one smooth motion. As its name suggests, it involves using our bass drum foot’s heel to generate the first stroke, and then the ball of our foot / toes to generate the second one. Due to its nature, it’s mainly intended to be used at faster tempos.


Of course, there are other techniques to get quick consecutive strokes, such as the slide technique, or the swivel technique. But this lesson focuses only the heel toe technique!


WHAT ARE ITS MISCONCEPTIONS?

The Heel Toe technique can be achieved on most, if not all, bass drum pedals. Whether they’re single or double chain, long boards, etc… As long as we’re applying the basic principles to achieve it, it should work on pretty much everything.


The technique works on most pedals, although it will probably be easier and smoother to perform on nicer pedals. If you’re looking to upgrade pedals, check out the big manufacturers’ websites, and go check ’em out in stores! The big companies make very nice and smooth pedals, even their basic / budget models are great.


heel toe technique

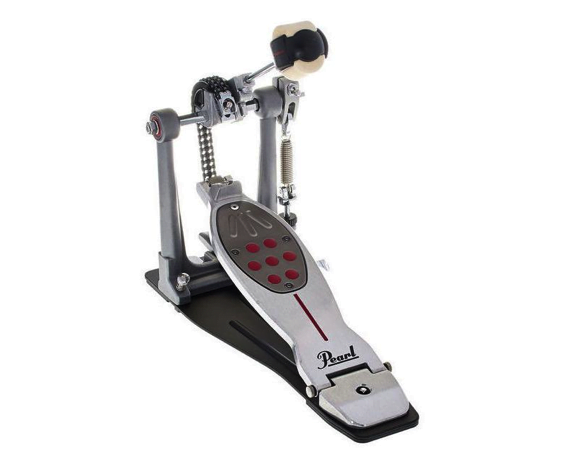
Pearl’s P-2050C is an excellent pro-level choice if you’re looking to upgrade your bass drum pedal.


THE COMMON PITFALL & TIPS

Things to consider when learning the Heel Toe technique is that everyone’s slightly different in their anatomy and motion, but the principles applied are exactly the same. Playing a relaxed stroke is probably the most difficult thing about it. Once you get over that hurdle, it’s pretty much smooth sailing from there! 

Watch the video below! It’s totally low production value, but it’s got some useful tips on how to approach and nail the technique’s motion. Enjoy it! 🙂


EXERCISES PDF

To help you practice the technique and apply the tips from the video above, I’ve put together a PDF with some useful exercises. These will help you develop some initial dexterity and coordination. You can also download the Heel Toe technique PDF below.


DOWNLOAD THE LESSON PDF HERE


LEARN MORE

If you want to learn more about the Heel Toe or some one-to-one lessons to help you troubleshoot or nail it, check out my drum lessons and get in touch! You can also check out my drum tuition book Concepts to help you create your own awesome grooves and fills!


drum book

Check out my book Concepts to help you come up with cool new grooves and fills with really simple ideas!


Thanks and enjoy! 🙂

Nick

3 Top Tips for Teaching Drums to a Child with SEN

3 Top Tips for Teaching Drums to a Child with SEN

TEACHING A CHILD WITH SEN


You know, teaching drums to many a child with SEN (Special Educational Needs) isn’t something I ever intended to do a lot of, yet I’ve had the opportunity to teach my fair share. Similarly, it’s also not something I ever expected to enjoy and have the patience for.

Now, my students like how patient I am, and my ability to break things down and explain them clearly. Of course, I take the compliment, yet I think it’s about acknowledging that people are wired differently. This, in my opinion, this makes for an effective teacher!


Teaching a child with SEN can be tons of fun!

I’ve worked with children on the Autistic spectrum, have Dyslexia, Dyspraxia, ADHD, or have been partially blind. Yet there’s always fun to be had with a child with SEN. Lessons can be made fun and engaging with learning activities based on rhythm, coordination and sounds.

child with SEN

Whatever the student’s needs, it’s important to be flexible, think on your feet and be prepared for the unexpected. Sometimes I find it’s much better to not have a plan. Just take it as it comes as you can always spin what catches the student’s eye into a relevant game.

So with that in mind, here are great tips which have been reinforced by experience which are worth sharing. These are particularly relevant if you’ve not formally trained in teaching a child with SEN, like myself.


#1. Be creative

As I mentioned before, being able to think on your feet is crucial. Similarly, whilst not having a lesson plan is useful, a long-term direction of skills to develop over time is crucial. That sense of direction will guide and inform you choice of activities.

The way I see it, creativity is strongly linked with the idea of long-term skill development. Try to understand how the child thinks and takes information in (see below). Try using the whole range of activities such as drawing, playing, listening, singing, moving / dancing, etc.

child with SEN


And, as far as creativity goes, I try to also not limit it to the activities but to the tools I use. These can include household items to make sounds, or things like the CHOPZzz drum pillowcase to have fun with.

teaching a child with sen

Using creative tools to make lessons engaging for students with SEN


#2. Make it a team effort

The better your understanding of the child with SEN, the better. And if the effort is collaborative team orientated with the parents / carers, even better! Working together with parents / carers is the best way to engage the child to ensure their development. In my experience, not only does this help set development goals and expectations, but engages the child from more than one positive influence!

Remember, sometimes it’s not about turning the student into the world’s next Jojo Mayer! Teaching basic co-ordination, exploring sounds, and helping in their general development through music is crucial in the child’s development.


#3. Be patient

Sometimes there’s a lot of messing around, and from a learning perspective, not much might get done on a particular session; that’s OK! Some sessions will be more productive than others. Just ensure to always try to keep the student engaged, and don’t lose focus. The way a child with SEN perceives the world at any given time might not be the same as yours, so keep an open mind. Be flexible and, above all, patient.

I hope this has been insightful and useful. If you’d like drum lessons for your child, learn more about my lessons here, and get in touch!

Nick 🙂

Keith Carlock Lick-Inspired Groove Drum Lesson

Keith Carlock Lick-Inspired Groove Drum Lesson

Thanks for checking out this Keith Carlock drum lesson! You can find other great, free drum lessons throughout my blog. Also, sign up to my mailing list to receive a free drum lesson every month. Head to my drum lessons page and sign up at the bottom of the page.


Keith Carlock Drum Lesson


As seen on his Drumeo lesson (check it out here), Keith Carlock breaks down his favourite lick which is based on the Paradiddle-diddle. To keep things brief, what he’s done is add two sixteenth note bass drums before the sticking. This makes the overall lick a sixteenth note-based phrase rather than a sextuplet, which is originally what how the Paradiddle-diddle is played.


What I’ve done in order to come up with this particular groove is fairly straight forward. I’ve taken the bass drums and placed them at the end of the sticking, that’s about it! Now, with regards to how I’ve orchestrated the sticking, this has to do a bit more with trying to get a tribal kinda vibe, the way Eloy Casagrande does. Watch the video below, and I think you’ll get a good idea about what I mean at around the 2:10 mark.


As Keith Carlock’s drum lesson reinforces, and rightfully so, we should try and make things we learn into our own thing… To give them our own spin! My book Concepts provides you with tools to help you put your own spin on licks, chops and grooves.


drum book

My book Concepts helps giving licks, chops and grooves your own spin. Check it out!


Also, if you’re interested in learning drums with me, check out my drum lessons.


DOWNLOAD FREE PDF HERE


Thanks again for stopping by, and enjoy!


Stay safe,


Nick 🙂

Alice In Chains’ Dam That River Drum Chart

Alice In Chains’ Dam That River Drum Chart

Thanks for checking out this drum lesson on Alice In Chains’ classic 1992 track Dam That River. Read some of the background below, make sure to read the tips that will help you nail the song’s feel, and download the free PDF transcription below.


ALICE IN CHAINS

Alice In Chains are one of Rock’s great bands that came out of Seattle in the 90s. Their heavier, darker sound compared to their peers helped them stand out in the scene. This was, in part, thanks to original singer Layne Staley whose lyrics about drug abuse were autobiographical and direct. Sadly, Staley died in 2002 from an overdose; found dead in his flat a week or so after his passing.


Alice In Chains Dam That River

Alice In Chains released their second album Dirt in 1992.


The band have continued to produce excellent music with singer William DuVall, who replaced Staley in 2006. Initially playing only live shows, DuVall has been a permanent member, recording the band’s first album since Staley’s death, the acclaimed “Black Gives Way To Blue”.


Alice In Chains Dam That River

Alice In Chains: (left to right) Jerry Cantrell, Sean Kinney, Layne Staley, Mike Starr


DAM THAT RIVER

Staley, however, left us some brilliant work to enjoy. Dirt, arguably the band’s best album, is a classic, featuring awesome songs including the punchy Dam That River. A tune that’s not only down right heavy, but beautifully simple, at least on the drums!

Drummer Sean Kinney delivers a no-frills performance, that’s straight to the point. It supports the guitar riffs in all the right ways, keeping it simple as most often is the best thing to do! In fact, my band The Mercy House, covered Dam That River to celebrate Layne Staley’s anniversary (check out the multi cam video). I tracked the drums along to the music so as to retain Sean Kinney’s time feel, which is tight, but nice and loose!


PERFORMANCE TIPS

I’ve transcribed Sean Kinney’s performance and parts on Dam That River pretty much note for note. Some of the fills on the guitar solo section I’ve left a bit more open to interpretation, so you can add your own spin to them. And, whilst the track might not be the toughest to play, it’s certainly oodles of fun! Here are some tips to help you nail the vibe.


3 bar phrases

It’s not as obvious upon casual listening, but the main riff (which opens the song and is the basis for the chorus) is a 3 bar phrase. Being aware of this will help you feel groove better as you’ll be paying attention to the phrasing and structure a bit better.


Quarter note feel

Verses are played on the hi hats loose and slushy, so keep your left foot nice and relaxed on the pedal. This will make your hi hat notes sustain between beats, helping to carry the groove. Also, notice how, at least to my ears, Sean Kinney seems to open the hi hats slightly more on the last quarter note of every verse (except where the flam is played).

Similarly, during the intro and choruses, we’re “crashing” on the ride cymbal, accenting on the down beats (the quarter notes). Sean Kinney may have played quarter notes on the ride, but I have chosen to interpret this as eighth notes with the aforementioned accents.


Guitar solo section

The guitar solo section is really interesting as we got some bars in 2/4 to help change up the phrasing. Also, pay attention to how the beginning of each phrase during this section starts with the bass drum on 2+ on the 2/4 measures.


DOWNLOAD THE PDF HERE


LAST BUT NOT LEAST

  • If you’re interested in learning to play more songs like this, or in other genres and styles, check out my drum lessons!
 
  • Check out my drum book “Concepts”, it’s got tons of fun ideas to help you take your drumming to the next level. Find out more here!
 
Bonham Triplets and Beyond

Bonham Triplets and Beyond

Whether you’re into Led Zeppelin and John Bonham’s playing or not, you’ll probably heard of Bonham triplets. Let’s face it, Bonham is synonymous with Rock drumming; he was a sonic and creative powerhouse. Some of his most legendary licks and grooves are triplet-based. So, in this drum lesson, we’ll explore phrasing ideas so you can master triplets like Bonham himself!

What makes a Bonham triplets?

Simply put, Bonham triplets refers to the way that he chose orchestrate that simple three note rhythm. Be it the “Crossover” fills or the great shuffle groove on Fool In The Rain, they just ooze with personality!

Crossover fill

Classic Bonham triplet fill right here!

Bonham triplet Crossover fill

Fool In The Rain

Beautiful groove… One of Jeff Porcaro’s influences in coming up with his Rosanna shuffle.

Bonham triplet Fool In The Rain


By the way, if you’re interested in other stylistic articles, check out my exploration of David Garibaldi’s Soul Vaccination grooves: Snare Accents vs Ghost Note Workshop and Beyond Soul Vaccination Grooves. Anyhow, back to the article:

Developing triplet-based ideas?

The purpose of this three part lesson is to help you develop learn some triplet-based ideas. As such, the view is to develop your own ideas and vocabulary! And he best part about it is that you’ll work on some core skills whilst you’re at it… These skills include:

Time and motion

You should aim to explore the accuracy of your strokes. Remember that both the physical and timing space between each note is as important as the note itself. Consequently, ensure that your playing is clear and clean, and your movements  motions are smooth.

drum book

Drum books such as Concepts can help you create new grooves based on really simple ideas… Check it out!

Check out my book Concepts for lots of ideas you can use to come up with new grooves based on stuff you already know!

Fluidity and creativity

By exploring different ways of applying these triplets, you’ll be able to incorporate them into your fills and grooves. Remember that each example in these articles is just that, an example. Exercise your creative muscle further by coming up with your own versions. The same applies with the orchestration of each example; orchestrate as you like!

Bonham triplets

John Bonham of the rock band ‘Led Zeppelin’ performs onstage at the Forum on June 3, 1973 in Los Angeles, California. (Photo by Michael Ochs Archives/Getty Images)

Practice tips

One thing is for sure, and that’s the fact that John Bonham was born playing his Bonham triplets. He practiced and explored ideas in order to develop his ideas. So, with that in mind, when you practice the exercises, I recommend you do the following:

Use a metronome and go slow

Practice each example slowly first and increase tempo only once comfortable. Try increments of 5BPM at a time.

Simple orchestrations first

Start orchestrating each example on snare drum until you’re comfortable with the pattern. Then orchestrate the pattern starting nice and simple.

Beyond grooves and fills

Don’t think of just fills and grooves, but rather explore each example melodically. Listen out for any melody that comes to mind as you play each exercise. You can turn each idea into a 4-bar phrase, or practice it by playing 4 bars of a groove, and 4 bars of the ideas.

Make it your own

Right, so maybe you want to learn specific Bonham triplets… Put it this way, by learning and exploring this stuff, it will  make it easier for you to learn his stuff. And, by exploring more general exercises, you’ll come up with your own style! Here’s an example of some ideas I came up with using concepts from this lesson:


You can download the PDFs to the grooves on this video here.


BONHAM TRIPLETS AND BEYOND PDFs

Download the PDFs and explore them in detail as suggested above.


Part I: Bass drums and dynamics

Explores using bass drums and dynamics to create more interesting phrasing ideas based on simple variations of the Bonham triplet.

DOWNLOAD PART I PDF HERE


Part II: Using rests

Builds on Part I by introducing the idea of rests within the pattern in order to create more variations.

DOWNLOAD PART II PDF HERE


Part III: Changing subdivisions

Here we take the triplet ideas we’ve been developing and change the subdivisions to create 16th note phrasing variations.

DOWNLOAD PART III PDF HERE


I hope you’ve enjoyed this drum lesson. If you’re interested, learn drums with me! Also, make sure to check out my book Concepts, which is full of cool ideas to take your playing to the next level.

HOW TO READ SHEET MUSIC: A GAME TO HELP YOU READING SKILLS

HOW TO READ SHEET MUSIC: A GAME TO HELP YOU READING SKILLS

HOW TO READ SHEET MUSIC AND RHYTHM

If you’re struggling with how to read sheet music, don’t be intimidated! We can use really simple tricks to help us figure these things out, particularly when it comes to reading rhythm.


Below is a quick guide to help you with how to read sheet music from a rhythm perspective! This lesson will be perfect if you’re a drummer looking to improve your basic reading skills!


I strongly believe in the connection between language and music, and thus rhythm. How? Simply put, languages use rhythmic patterns of stressed and unstressed syllables that we use without really noticing. So, when we pay attention to these rhythms, we can use them to our advantage!


CONTEXT IS EVERYTHING

Let’s start by using a steady pulse, as this will give context to all the notes we’ll read and play. I’d suggest you download a metronome app if you don’t have one already. Personally, I really like Tempo by frozen ape which you can get on iOS or Android.


how to read sheet music

A metronome helps us accurately determine the value of each note


READING MUSIC: IT’S A GAME, REALLY!

The goal of the game is to start each insect below at the same time as every click from the metronome. We’ll start slowly, setting our tempo to 60 BPM (Beats Per Minute).

how to read sheet music

Learning to read music is a game!


In order to get it right, ensure that each syllable we say (out loud) is evenly subdivided. We’ll be associating each word, in this case an insect, to a symbol. Be sure say it out loud, clap it, and play it in time!


CLAP IT, TAP IT, SAY IT, PLAY IT (BOP IT)

As I mentioned above, we can practice these rhythms by clapping, saying them out loud, playing them using your practice pad, cushion or even pillowcase practice pad.


3 BASIC RHYTHMS

Let’s start with the following three basic rhythms and assign them an insect.


how to read sheet music

Using insects to help us remember rhythms is a great learning aid!


Quarter notes, or crochets

If we split a bar of music into 4 quarters, we can fit 4 quarter notes in it. We’ll start with this premise, and say we can fit 4 single syllable insects inside it. So our quarter note insect is the Ant!

how to read sheet music


Eighth notes, or quavers

With these we can fit two syllables inside one word (beat). So we’ll call these Spider.

how to read sheet music


Sixteenth notes, or semiquavers

As sixteenth notes are 4 notes inside one beat, let’s fit 4 syllables inside one word and call them Caterpillar.

How to read sheet music


Once we have the basic rhythms above, how to read sheet music starts seeming less daunting! Again, we’re focusing primarily on rhythm, but this is half the battle!


The following PDF contains some exercises for you to try out. Note that sometimes you’ll see the following symbol.


how to read music


This simply means a quarter (crotchet) rest which is the same duration as a quarter note, but we don’t play a sound.


Have a go at it, and see if you can get through all of them! It’s tons of fun, and you’ll definitely get better at how to read sheet music by going through all of ‘em.


Download it here


TAKE IT UP A NOTCH!

The next step is to actually start mixing these basic rhythms around in order to start creating new, more complex rhythms. Here are three fun, common ones we hear in music all the time, orchestrated (i.e. how they’re played) in obvious, or subtle ways.

how to read sheet music

Handy diagram to help better understand things


Grasshopper: one word, one long syllable followed by two short ones

how to read sheet music


Centipede: one word, three short syllables

how to read sheet music


Dragonfly: one word, one short syllable followed by a long one, then a short one

how to read sheet music

So, for this I’ve written a few exercises for you to have a go at to help you how to read sheet music. I’ve opted to keep them fairly simple as the idea is to develop your reading little by little rather than throw you into the deep end from the get-go!


Download the second part here


CONCLUSION!

There are, of course, more variations as well as rests to learn about! However I think these are great ones to get to grips with if you’re a beginner, or are looking for tips to get better at how to read sheet music. So, yeah, make it your own and fly with it!

Nick

Don’t forget to check out my drum lessons!


Also, check out my drum book for tons of creative ideas to help you freshen up your playing too!